When I first started Winter Bee Garden, Mr. Bee got me a small (10x20ft), aluminum tubing frame ‘greenhouse.’ It was one of those learning experiences about discovering what you need and don’t need as a newbie flower farmer.
Mr. Bee laid 8×8 timbers in the ground and attached the greenhouse to the timbers, so the frame stays stays put in the highest wind (yay!). The frame itself still wobbled in the wind, which lead to issue #2: the ‘house style’ frame which created pressure points in the fabric, and it started ripping.


A big downside to the greenhouse is the sides can only roll up about 10 inches, which did not provide enough air circulation in warm weather. The greenhouse regularly went over 90°F and higher, so I couldn’t actually plant anything inside.
So what to do? At this point as a grower, I really want to extend my season for earlier in spring and later in fall. Plus there are some flowers that will grow taller in a tunnel or hoop house.
A Speedy Review of Greenhouses, High Tunnels, and Hoop Houses
For the most part, it all comes down to the structural permanence of each.
A greenhouse is the most durable building, usually with some kind of heating/cooling system, that allows year-round use for growing. Plants are often grown in containers in a greenhouse.
High tunnels are less permanent- while not easy, they can be moved around a property if needed. Plants are grown in ground, and, as the name suggests, they are tall. And big- usually 20-30 feet wide and all the way to 100 feet long. Because they are built high, farm machinery can be used inside.
A hoop house is smaller, more portable, and easier to build (a homeowner DIY) than the others.
If you’d like to learn more, this is a good site: Rimol Greenhouses.
What We’re Doing
After visiting friends with hoop houses or high tunnels and watching many videos, I had a good idea of what I needed: namely, a good poly sheeting that would withstand the elements, the ability to raise the sides at least 4 feet, addressing the pressure points in the roof line, and how to securely attach the poly.
First we cut the old covering off the sides. We kept the front and back since they are in good shape and we don’t really want to build wooden framing and a new door.


We added ratchet straps for extra stability in nasty weather. This baby isn’t going anywhere!

1×8’s are attached at the bottom for stability and to keep the sides in place. These boards also serve as ground-level protection for the plants. The sides hang loosely on pipes (from the center board down) so weather can creep in and cause damage.
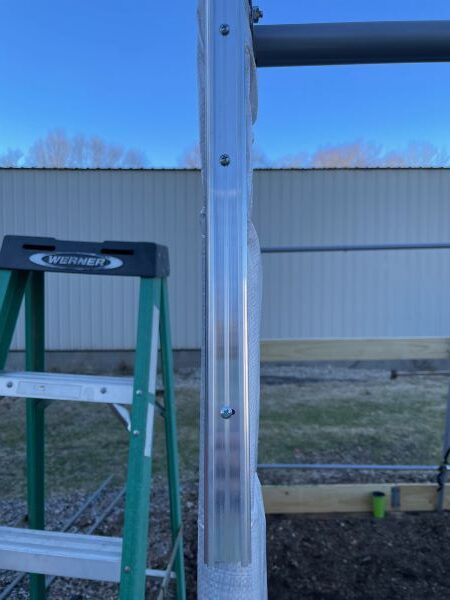
The middle boards are 1×4’s set about 4 feet off the ground. The wiggle wire channel is attached and the sides will roll up to this board. In the heat of summer, shade cloth will cover the top of the hoop house and be attached to the side board.


Wiggle Wire?
This is wayyyy cool, folks!
There needs to be a way of attaching the poly sheeting to the frame, as weather-tight as possible, and with the ability to replace the sheeting every few years.
Enter wiggle (or spring lock) wire! Aluminum channels are attached to the frame, then the plastic is pulled taut over the channel. Then you weave the wiggle wire into the channel, and voila! your covering is secure.


We screwed the wiggle wire channel directly to the hoop house frame on the ends. The channel is flexible enough to easily bend over the curves of the frame.
Stayed tuned for part 2!
I don’t mean to leave you hanging, but this is far as we’ve gotten, and I couldn’t wait to share this with you!
In case you can’t tell, I am EXCITED to have a little hoop house, and to see how much I can grow in a relatively small space. I’ll leave you a picture of the ranunculus, which is also very anxious to get inside the hoop house and bloom!

Happy garden dreams, friends. 🌼💚Pam
